Missing teeth can affect more than just your smile they can impact your confidence, speech, and ability to chew properly. Dental implants have become one of the most popular and effective tooth replacement solutions because they look, feel, and function just like natural teeth.
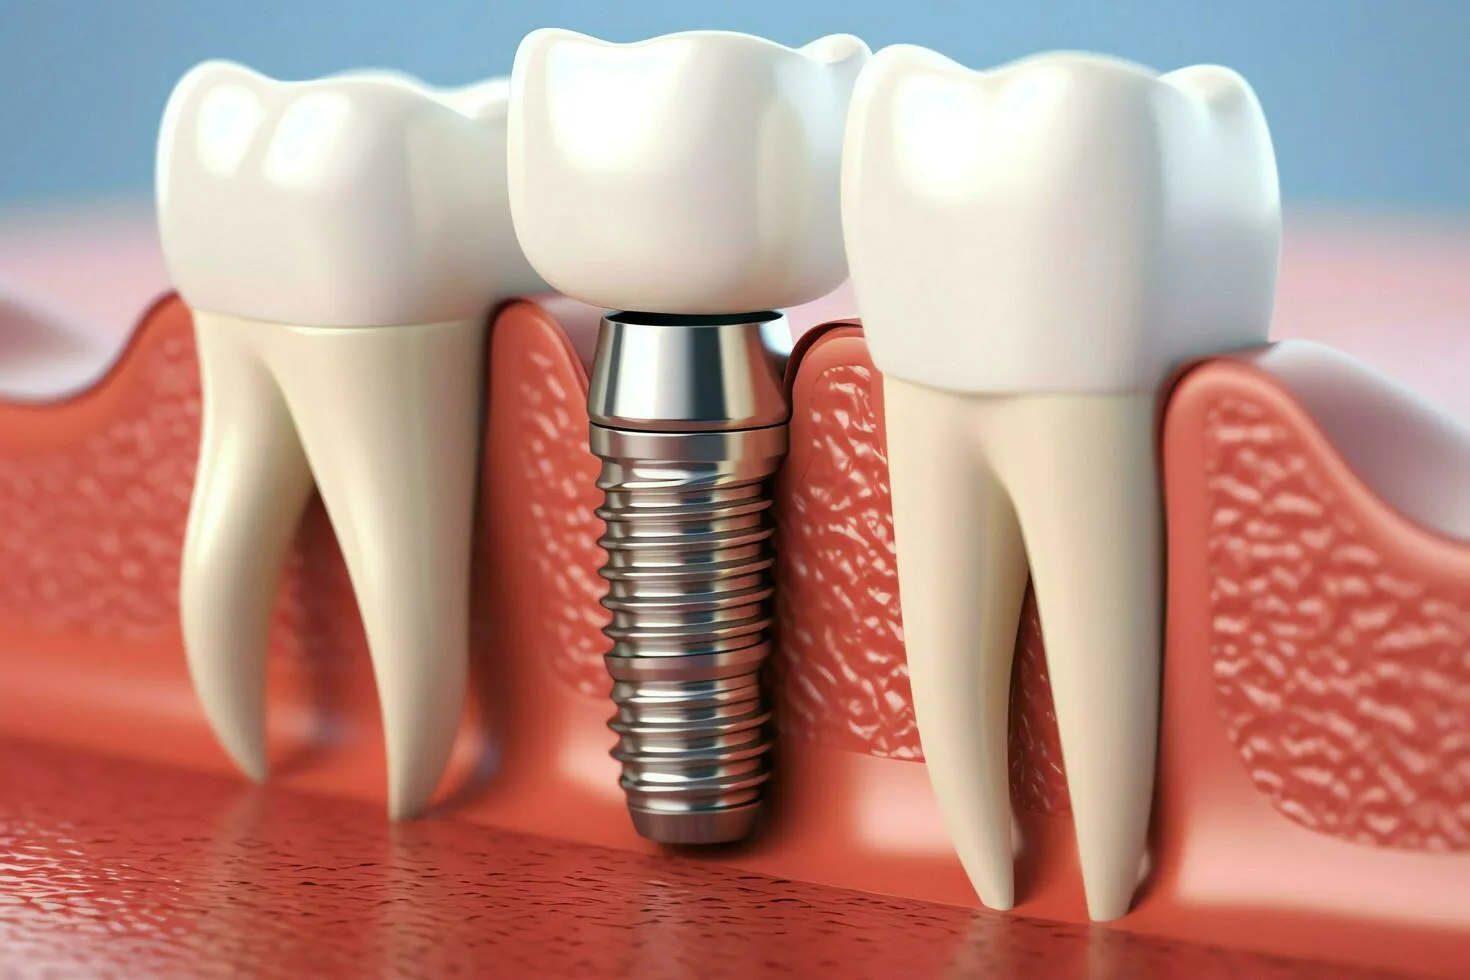
A titanium or zirconia screw that is surgically placed into the jawbone, acting as an artificial tooth root.
A small connector that attaches to the implant post and supports the visible crown.
The custom-made artificial tooth that sits on top of the abutment, crafted to match the shape, size, and color of your surrounding teeth.
Together, these components create a strong, stable foundation that restores both the functionality and appearance of your natural tooth.
Dental implants are widely regarded as the gold standard for tooth replacement due to their long-term benefits. Unlike dentures or bridges, implants fuse with your jawbone through a process called osseointegration, offering unmatched stability and support.
Key Benefits Include:
Natural Look and Feel
Implants blend seamlessly with natural teeth, enhancing your smile’s appearance.
Durability and Longevity
With proper care, implants can last a lifetime making them a cost-effective long-term investment.
Preserves Jawbone Health
The implant post stimulates bone tissue, preventing bone loss and maintaining facial structure.
Improved Oral Function
Restores full chewing power, allowing you to eat comfortably and speak clearly.
No Impact on Surrounding Teeth
Unlike dental bridges, implants don’t require altering neighboring teeth for support.
In essence, dental implants provide a permanent, natural-looking solution that restores confidence, comfort, and oral health.
Step 1 Initial Consultation & Evaluation
What happens
Medical and dental history review (medications, chronic illnesses, smoking).
Clinical exam of the mouth, gums and existing teeth.
Imaging: bitewing/periapical X-rays plus often a 3D cone-beam CT (CBCT) to measure bone height/width and map anatomy (especially sinuses and nerves).
Discussion of goals: single tooth, multiple teeth, full-arch replacement, aesthetic priorities, timeline and budget.
Why it matters
The CBCT tells your dentist if you have enough bone to hold an implant and whether any anatomic limits (sinus, nerve) exist.
Your overall health and medications (e.g., bisphosphonates, uncontrolled diabetes) influence candidacy and timing.
Possible preparatory treatments
Tooth extraction (if infected tooth remains). Healing may be immediate implant or delayed depending on infection and bone quality.
Bone grafting to build deficient bone (may add 3–6+ months healing).
Sinus lift (for upper back teeth where sinuses are low) may require 4–9 months for graft maturation before implant in some cases.
Periodontal treatment if gum disease is present infection should be controlled first.
Patient tips
Bring a list of medications and any imaging you already have.
Stop smoking if possible smoking lowers implant success rates.
Step 2 Treatment Planning
What happens
A customized plan is created: implant size/brand, exact position, number of implants, need for grafts, and timeline.
Options explained: immediate implant placement (implant placed at time of extraction), delayed placement (after healing), and immediate loading (temporary crown placed same day) versus staged loading.
Timeline examples
Simple case (adequate bone, single implant): consultation → surgery → 3–4 months healing → abutment/crown.
With bone graft: consultation → grafting → 3–6+ months healing → implant placement → 3–4 months osseointegration → abutment/crown.
Coordination
Your dentist may coordinate with an oral surgeon, periodontist, or prosthodontist depending on complexity.
Patient tips
Ask for a written timeline and estimate of number of visits.
Confirm sedation/anesthesia options and costs.
Step 3 Implant Placement Surgery
What happens
Office procedure under local anesthesia; sedation options include nitrous oxide (laughing gas), oral sedatives, or IV sedation general anesthesia used rarely for complex cases.
A small incision is made in the gum, bone is prepared with precise drills, and the implant post (titanium or zirconia screw) is inserted into the jawbone. The gum is sutured over or around the implant.
In some cases a healing cap is placed; in others the surgeon closes the tissue for submerged healing.
Duration & sensations
Typical time: 30–90 minutes per implant (varies by number/complexity).
You should feel pressure, vibration, and some movement but no sharp pain during the procedure because of anesthesia. Mild to moderate soreness and swelling are normal afterward.
Immediate loading
If initial stability is excellent, a temporary crown or bridge may be attached the same day (immediate restoration). This is case-specific and depends on location, bone quality, and biting forces.
Aftercare (first 48–72 hours)
Expect swelling and mild bruising; ice packs and head elevation help.
Pain controlled with OTC or prescribed analgesics.
Soft diet for several days, avoid vigorous rinsing or spitting.
Avoid smoking and alcohol.
Step 4 Healing & Osseointegration
What is happening
Osseointegration = the biological process where bone grows tightly around the implant surface, anchoring it permanently. This is essential for implant success.
Typical timeline
Most implants require 3–6 months of healing for adequate osseointegration. Upper jaw and grafted bone often need longer than lower jaw.
Temporary restorations
While the implant integrates you may have a temporary crown or removable prosthesis to restore appearance and function without loading the implant excessively.
Care during healing
Maintain excellent oral hygiene around adjacent teeth; follow instructions for gentle cleaning around the surgical site.
Attend scheduled follow-ups so the clinician can check healing and suture removal.
Signs of normal vs. concerning healing
Normal: mild soreness, gradual reduction of swelling, no fever.
Concerning: persistent severe pain, increasing swelling, fever, pus, or a loose implant contact your dentist promptly.
Step 5 Attaching the Abutment
What happens
Once the implant is integrated, the next minor step is attaching the abutment (the connector between the implant and the crown).
This can be done in one of two ways:
One-stage approach: abutment placed at time of implant surgery and exposed above gumline throughout healing.
Two-stage approach: implant covered during healing; a small second procedure reopens the gum and attaches the abutment.
Procedure & recovery
Quick, often done under local anesthetic; may cause minor soreness for 24–48 hours.
Soft tissue shapes around the abutment to create a natural gum contour for the final crown.
Step 6 Fabrication & Placement of the Final Crown
What happens
Impressions (digital or physical) are taken to make a custom crown that matches the color, shape and bite of your natural teeth.
The crown may be cemented onto the abutment or screw-retained into the implant (both methods have pros/cons).
Materials
Crowns are commonly made of porcelain fused to zirconia, full zirconia, or porcelain fused to metal chosen for strength and aesthetics.
Final fitting
Your dentist will check occlusion (bite), make adjustments, and ensure comfort and aesthetics.
Once fit is perfect, the restoration is finalized result: a fully functional, natural-looking tooth.
Post-placement care
You may have slight soreness for a day or two while soft tissues settle.
Maintain routine oral hygiene and schedule regular dental exams and cleanings.
Extra Practical Tips to Improve Success & Comfort
Stop smoking before and after surgery smoking greatly increases failure risk.
Manage systemic conditions (e.g., keep diabetes controlled).
Follow antibiotic and analgesic instructions if prescribed.
Avoid hard/chewy foods on the implant side until fully restored.
Use a soft toothbrush and antimicrobial rinse as directed during early healing.
Attend all follow-up appointments early detection of problems is key.
Possible Risks & When to Call Your Dentist
Common, temporary issues
swelling, bruising, mild pain, minor bleeding.
Less common complications
infection, implant mobility, nerve irritation (numbness/tingling), sinus complications for upper implants.
Call your dentist immediately if you have
uncontrolled bleeding, high fever, severe pain not relieved by medication, increasing swelling after 72 hours, pus discharge, or a sensation that the implant is loose.
Typical Timelines at a Glance
Consultation & planning: 1–3 visits (1–4 weeks).
Bone graft (if needed): heal 3–6+ months.
Implant placement: 1 visit (30–90 min per implant).
Osseointegration: 3–6 months (sometimes longer with grafts).
Abutment and impression: 1–2 visits.
Final crown placement: 1 visit.
Total time (simple case): 3–6 months. With grafts or complex cases: 6–12+ months.
Aftercare and Recovery Tips
Proper aftercare is essential to ensure your dental implant heals successfully and integrates firmly with your jawbone. Following your dentist’s instructions carefully during the recovery period helps prevent complications and promotes faster healing.
Managing Discomfort, Swelling, and Mild Bleeding
Mild pain or swelling is normal for the first few days after surgery. Use over-the-counter pain relievers or prescribed medication as directed.
Apply an ice pack to the affected side for 10–15 minutes at a time within the first 24 hours to reduce swelling and bruising.
Minor bleeding or oozing may occur for up to 24 hours. Bite gently on sterile gauze to help stop bleeding avoid spitting or rinsing vigorously.
Keep your head elevated while resting to minimize swelling and discomfort.
Oral Hygiene Practices and Foods to Avoid
Oral care is critical: Gently brush your teeth, avoiding the surgical area for the first few days. After 24 hours, rinse with a warm saltwater solution (½ teaspoon of salt in a glass of water) two to three times daily.
Avoid hard, sticky, or crunchy foods (like nuts, chips, and candy) for at least a week. Stick to a soft diet soups, yogurt, mashed potatoes, eggs, and smoothies are ideal.
Do not smoke or drink alcohol, as both can delay healing and increase the risk of implant failure.
Maintain excellent oral hygiene even after initial healing clean around the implant using a soft-bristled toothbrush and floss or interdental brushes designed for implants.
Importance of Follow-Up Visits
Regular follow-up appointments allow your dentist to:
Monitor healing and detect any early signs of infection or implant movement.
Remove sutures (if non-dissolvable).
Evaluate osseointegration progress before proceeding to the next phase (abutment or crown placement).
Provide personalized advice on oral care and dietary habits.
Most patients can resume normal activities within 2–3 days, but full recovery and bone integration may take 3–6 months. Consistent care and professional supervision are key to ensuring long-term implant success.
Potential Risks and How They’re Managed
Dental implants have a very high success rate typically over 95% when performed by an experienced dentist. However, like any surgical procedure, they come with a few potential risks. Understanding these possibilities and the preventive measures your dentist takes can help you feel more confident and prepared.
Possible Complications
Infection at the Implant Site
Bacteria can enter the surgical area, causing inflammation or delayed healing. Proper sterilization, antibiotics, and good oral hygiene significantly reduce this risk.
Nerve Irritation or Injury
In rare cases, improper implant placement near nerves (especially in the lower jaw) can lead to temporary tingling, numbness, or pain. Dentists use 3D imaging (CBCT scans) to precisely plan implant positioning and avoid nerve contact.
Sinus Complications (Upper Jaw Implants)
When placing implants near the sinus cavity, there’s a slight risk of sinus membrane perforation. Pre-surgical sinus lift procedures or careful planning help prevent this issue.
Implant Failure or Poor Osseointegration
Sometimes the bone doesn’t fuse properly with the implant, often due to infection, smoking, or underlying health conditions. If failure occurs, the implant can usually be replaced after the site heals.
Preventive Measures Taken by Dentists
Comprehensive Pre-Surgical Assessment
X-rays, 3D scans, and digital planning ensure precise implant placement and identify any bone or sinus concerns.
Sterile Surgical Environment
Strict infection control protocols minimize contamination risk during surgery.
Use of Biocompatible Materials
High-quality titanium or zirconia implants promote safe, long-term integration with the jawbone.
Careful Post-Operative Monitoring
Regular follow-ups help detect early signs of infection or inflammation before they become serious.
Patient Education
Dentists provide clear aftercare instructions on hygiene, diet, and habits like quitting smoking to improve success rates. When performed by skilled professionals and followed by diligent patient care, dental implants are a safe, predictable, and long-lasting tooth replacement solution.
Conclusion
Getting dental implants is a journey toward restoring both your smile and confidence. From the initial consultation and precise implant placement to healing and final restoration, each step is carefully planned to ensure lasting comfort and functionality.
With a success rate exceeding 95%, dental implants are one of the most reliable solutions for replacing missing teeth. They not only look and feel natural but also help maintain jawbone health and prevent future dental issues.
If you’re considering dental implants, consult a qualified and experienced dentist to discuss your individual needs and treatment options. With professional guidance and proper care, you can enjoy a strong, beautiful smile that lasts a lifetime.
FAQs
1. How long does a dental implant procedure take?
The entire process can take several months, depending on healing time. The surgery itself usually lasts 1–2 hours per implant.
2. Is the dental implant procedure painful?
No, the procedure is performed under local anesthesia or sedation, so you shouldn’t feel pain only mild pressure or discomfort.
3. How long does it take to heal after getting a dental implant?
Healing generally takes 3–6 months as the implant fuses with the jawbone during osseointegration.
4. Can anyone get dental implants?
Most adults with healthy gums and sufficient bone density are good candidates, though some may need bone grafting first.
5. How long do dental implants last?
With proper care and regular dental checkups, implants can last 15 years or longer, often a lifetime.


